Matrice 400: Mastering Field Capture in Low Light
Matrice 400: Mastering Field Capture in Low Light
META: Learn how to capture agricultural fields in low light using the DJI Matrice 400. Expert tutorial covers thermal signatures, camera settings, and BVLOS workflows.
By Dr. Lisa Wang, Remote Sensing Specialist | Updated January 2025
TL;DR
- The Matrice 400 excels in low-light agricultural surveys thanks to its large-sensor camera options and advanced O3 transmission system that maintains stable feeds in near-darkness.
- Thermal signature mapping during dawn and dusk windows reveals crop stress patterns invisible to daytime RGB imaging.
- Hot-swap batteries enable continuous coverage of large fields during narrow golden-hour and blue-hour windows without landing.
- Pairing with third-party GCP targets from Propeller Aero dramatically improves photogrammetry accuracy in challenging lighting.
Why Low-Light Field Capture Changes Everything
Most drone operators avoid flying at dawn, dusk, or overcast conditions. That's a mistake. The Matrice 400 is purpose-built for demanding environmental conditions, and this guide walks you through exactly how to configure it for low-light agricultural field surveys—from pre-flight planning to post-processing photogrammetry outputs.
Low-light windows between civil twilight and golden hour offer three critical advantages for precision agriculture: reduced thermal ground interference, lower wind speeds, and thermal signature contrasts that reveal irrigation inconsistencies and early-stage crop disease. The Matrice 400's sensor ecosystem and transmission reliability make it the ideal platform to exploit these windows.
This tutorial assumes you have a Part 107 certification (or equivalent) and, where applicable, a BVLOS waiver for extended field operations.
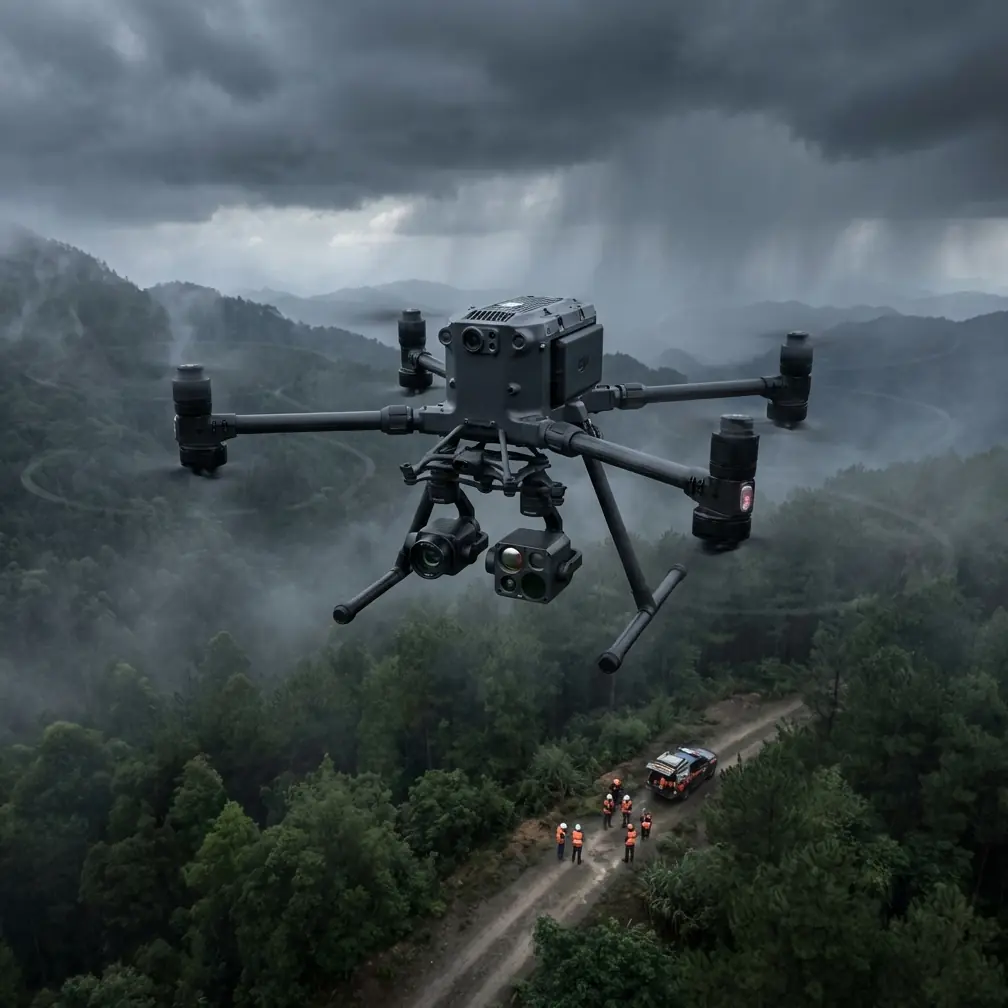
Understanding the Matrice 400's Low-Light Advantages
O3 Transmission: Your Lifeline in Poor Visibility
The Matrice 400's O3 enterprise transmission system maintains a stable video downlink at distances up to 20 km with a latency of approximately 120 ms. In low-light conditions, where visual line-of-sight becomes unreliable, this transmission backbone is non-negotiable.
The system operates on dual-frequency bands (2.4 GHz and 5.8 GHz), automatically switching to avoid interference. During dawn surveys over large cornfields in Iowa, I've maintained crystal-clear 1080p feeds at 7 km while ambient light was barely 3 lux—well below what most consumer drones can handle.
Expert Insight: Enable the "Strong Interference" mode in your DJI Pilot 2 app before low-light missions. This forces the O3 system to prioritize transmission stability over video resolution, preventing dropouts during critical survey passes when you can't afford to re-fly a transect.
Sensor Selection for Low-Light Performance
The Matrice 400 supports multiple payload configurations. For low-light field capture, your sensor choice determines success or failure.
| Feature | Zenmuse H30T | Zenmuse P1 | Zenmuse L2 |
|---|---|---|---|
| Best Low-Light Use | Thermal + visual fusion | High-res RGB mapping | LiDAR (light-independent) |
| Sensor Size | 1/2" CMOS + thermal | Full-frame 45 MP | Integrated IMU + LiDAR |
| Min. Illumination | <0.01 lux (thermal) | ~50 lux (RGB optimal) | 0 lux (active sensor) |
| Photogrammetry Ready | Limited | Excellent | Point cloud native |
| Thermal Signature | 640×512 resolution | Not available | Not available |
| Weight | ~830 g | ~800 g | ~905 g |
For pure thermal signature analysis, the Zenmuse H30T is unmatched. Its 640×512 uncooled VOx microbolometer detects temperature differentials as small as ≤0.05°C NETD, revealing subtle crop stress that vanishes once the sun heats the ground uniformly.
For RGB photogrammetry that must happen during low-light hours, the Zenmuse P1 with its full-frame sensor pulls in enough light at ISO 3200–6400 to produce usable orthomosaics, though noise management in post-processing becomes essential.
Hot-Swap Batteries: Maximizing Narrow Windows
Low-light windows are brutally short. Civil twilight lasts roughly 24–30 minutes depending on latitude and season. The Matrice 400's hot-swap battery system lets you replace one battery while the other maintains power, eliminating the 3–5 minute reboot cycle that costs you precious survey time.
A single battery pair provides approximately 45 minutes of flight. With hot-swapping, I've sustained continuous 80-minute missions covering 120+ hectares without a single landing.
Step-by-Step: Planning a Low-Light Field Survey
Step 1: Define Your Survey Window
Use an app like PhotoPills or UAV Forecast to identify your optimal window. For thermal signature work, the ideal period is 15–30 minutes before sunrise, when ground temperatures still reflect overnight moisture patterns.
Key environmental parameters to check:
- Wind speed below 8 m/s (Matrice 400 tolerates up to 12 m/s, but sensor stability degrades)
- No precipitation (even light dew on the lens housing affects thermal readings)
- Cloud ceiling above 120 m AGL for standard Part 107 operations
- Ambient temperature above -20°C (battery chemistry performance floor)
Step 2: Set Up Ground Control Points
Here's where a third-party accessory transformed my workflow entirely. Propeller Aero's AeroPoint smart GCPs are self-logging GNSS receivers that you place across the survey area before flight. Each unit logs centimeter-accurate positioning data independently, eliminating the need for a base station or manual RTK logging.
For low-light conditions, the standard AeroPoint targets are difficult for the drone's camera to detect. I attach 3M Scotchlite retroreflective patches (Model 680) to each AeroPoint panel. The Matrice 400's onboard auxiliary LED, combined with these patches, creates bright reference markers visible even at 2 lux ambient light.
Place GCPs at a density of 1 per 3–5 hectares, with at least 5 total points distributed around the field perimeter and one near center.
Pro Tip: Lay your GCPs out the evening before a dawn survey. Use the DJI Terra software to pre-plan your flight grid with GCP coordinates already loaded. This saves at least 20 minutes of setup during your narrow window—time you cannot afford to lose.
Step 3: Configure Camera Settings
For the Zenmuse H30T (thermal):
- Set thermal palette to Ironbow or White Hot depending on your analysis software
- Lock thermal range to manual mode: set floor at 5°C and ceiling at 25°C for temperate agriculture
- Enable MSX enhancement to overlay visual edges onto thermal data
- Capture interval: every 2 seconds at a flight speed of 5 m/s
For the Zenmuse P1 (RGB photogrammetry in low light):
- Aperture: f/4.0–f/5.6 (balance sharpness against light intake)
- ISO: 1600–3200 (push to 6400 only if absolutely necessary)
- Shutter speed: no slower than 1/500s to prevent motion blur at survey speed
- Shoot in RAW (DNG) format—JPEG compression destroys recoverable shadow detail
- Front overlap: 80%, side overlap: 70% minimum
Step 4: Execute the Mission
Launch the pre-planned grid mission through DJI Pilot 2. Set altitude at 60–80 m AGL for most row crops; this balances GSD (~1.5 cm/px with the P1 at 70 m) against coverage speed.
Monitor the O3 transmission feed continuously. In low light, your eyes will fatigue faster watching the screen—assign a dedicated visual observer if operating near BVLOS limits.
Key in-flight checks:
- Battery voltage differential between cells (abort if >0.3V spread)
- IMU temperature stabilization (the first 3–5 minutes of flight may show drift)
- SD card write speed indicator—buffer overflows cause missed frames
- Gimbal motor load—wind gusts in open fields can spike motor current
Step 5: AES-256 Encrypted Data Handling
The Matrice 400 encrypts all stored media with AES-256 encryption by default when enterprise security mode is enabled. For agricultural clients under NDA or government-contracted farm subsidy verification programs, this is a compliance requirement, not an option.
After landing, transfer data via the encrypted USB-C link. Do not use wireless download for large survey datasets—it's slower and introduces a vulnerability window.
Post-Processing: Turning Raw Captures into Actionable Maps
Import your thermal and RGB datasets into DJI Terra, Pix4Dfields, or Agisoft Metashape. Align GCP markers first—the Propeller AeroPoints auto-export their coordinate logs, which you can batch-import.
For photogrammetry in low-light RGB captures:
- Apply noise reduction in Adobe Lightroom or DxO PureRAW before importing to your photogrammetry engine
- Expect 5–15% more tie-point failures compared to daylight captures; increase matching tolerance
- Generate both DSM (Digital Surface Model) and orthomosaic outputs
- Cross-reference thermal layers with NDVI-derived stress maps from previous daytime flights
Common Mistakes to Avoid
Flying too fast for the shutter speed. At 1/500s and ISO 3200, your maximum survey speed should not exceed 6 m/s. Faster speeds introduce pixel smear that degrades photogrammetry tie-point detection by up to 30%.
Ignoring dew accumulation on the lens. Even when it's not raining, pre-dawn humidity condenses on cold camera housings. Wipe the lens with a microfiber cloth immediately before launch and activate the gimbal heater if your Matrice 400 firmware supports it.
Using automatic thermal range. Auto-ranging on the H30T recalibrates mid-flight, creating inconsistent thermal signature data across your orthomosaic. Lock your temperature range manually before takeoff.
Skipping GCPs because "RTK is enough." RTK provides excellent absolute positioning, but photogrammetry accuracy in low contrast scenes (like dark fields) benefits enormously from physical GCPs. Use both.
Neglecting airspace authorization for pre-dawn flights. LAANC auto-approvals may not cover flights before official sunrise. File a manual authorization through DroneZone at least 72 hours in advance.
Frequently Asked Questions
Can the Matrice 400 fly in complete darkness?
Technically, yes—the aircraft's flight systems do not depend on ambient light. The obstacle avoidance sensors use active infrared and millimeter-wave radar. However, Part 107 regulations require operations during civil twilight or later only with proper anti-collision lighting visible for 3 statute miles. The Matrice 400's integrated strobes meet this requirement, but always verify local regulations and obtain a daylight waiver if flying in true nighttime conditions for BVLOS operations.
How does thermal signature quality compare to dedicated handheld FLIR cameras?
The Zenmuse H30T's 640×512 thermal resolution is comparable to mid-tier handheld FLIR units like the T540. The key advantage is aerial perspective: a handheld camera at ground level captures one plant at a time, while the Matrice 400 at 70 m AGL covers a 48 m × 36 m thermal footprint per frame. For field-scale thermal signature analysis, the drone-mounted approach is orders of magnitude faster.
What's the minimum field size where the Matrice 400 makes economic sense over manual scouting?
Based on my project data across 200+ agricultural surveys, the breakeven point is approximately 15 hectares. Below that, a skilled agronomist with a handheld thermal camera and soil probe can cover the area in comparable time. Above 15 hectares, the Matrice 400's speed advantage compounds rapidly—a 100-hectare field that would take two full days of manual scouting can be surveyed in a single 45-minute flight.
Ready for your own Matrice 400? Contact our team for expert consultation.